AXIOMATIC OBJECT
|
Overview
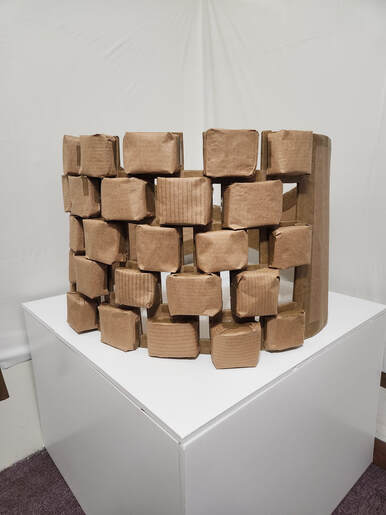
Title: Generational Treasure
Size: 60.96 cm by 45.72 cm Medium: Cardboard Sculpture Date: January 2023 Exhibition Text
"Generational Treasure" is a large sculpture of a ring I own made completely out of cardboard, glue, and tape. This ring was passed down to me from my great aunt and holds a lot of value to me. This piece is meant to represent how identity can be passed down through generations and generational heirlooms. I took inspirations from the sculptural work of Claes Olderburg, Coosje van Bruggen, and Chris Gilmour when creating my piece. |


INSPIRATIONS
|
Plantoir by Spoonbridge and Cherry
Claes Oldenburg and by Claes Oldenburg and Coosje Cooseje van Bruggen van Bruggen. I was also introduced to the art of Chris Gilmour. Chris Gilmour is a British sculpture who used solely corrugated cardboard and glue to create large intricate sculptures. I was really inspired by his ability to create extremely clean and detailed sculptors out of something that many people would consider trash. I was specifically impressed by his piece Bicycle because of the way he was able to translate all of the details on the bike into a large cardboard sculpture. This is a skill I need to be able to take with me when creating my own sculpture. Especially because I chose to enlarge such a small and intricate object, I need to be able to make sure those details are shown in my scaled up sculpture. I was also inspired by his piece Camera. With this piece I was intrigued by the way he was able to manipulate the cardboard in to create different shapes and forms. When making my piece I will need to find a way to manipulate the cardboard in order to create a curved shape, so I wanted to look at this piece to see the ways in which he manipulated his medium. |
When trying to find inspiration for my axiomatic object, I was introduced to the work of Claes Oldenburg and his wife Coosje van Bruggen. These artists were pop art sculptors who often took everyday objects and enlarged them on a massive scale. I thought it was really interesting how he was able to take average items and give them meanings and purposes. His piece Plantoir specifically looks at a common gardening tool and alters it so that we view it in a completely different way. I was very intrigued how he was able to alter the way we view objects that we might just look past in our day to day lives. I was also really drawn to his piece Spoonbridge and Cherry. It's very interesting to me how Oldenburg and Coosje van Bruggen were able to alter the form of the spoon and the cherry, and once again change how we view these items. We would never see a spoon and cherry that looked like this in real life, but these sculptors were able to bring this idea to life on a large scale. When I make my own sculpture I want to be able to enlarge an object and manipulate the shape and form. I also want to alter the way that the object is perceived.
Bicycle by Camera by
Chris Gilmour Chris Gilmour |


PLANNING

After I had completed some beginning sketches, I created some orthographic sketches of the ring. I made orthographic projections of the top, right side, front, and back of the ring. I did this in order to understand what this object looks like from each angle. At this point in my planning I also needed to begin to get measurements of different aspects of my ring. This was very difficult because the ring is so small itself that measuring the exact details became nearly impossible. I needed to get the measurements though in order to figure out how large I needed to enlarge the ring. I naturally knew that I was going to need to make the ring a lot larger than it already was, but I was quite sure how large I should actually make it. Once I wrote down the measurements I was able to begin to consider the smaller details of my ring.

|
When starting to plan out my axiomatic object, I needed to first consider what object I wanted to create. I wanted to think of a piece that would hold significance to me, and one that I could connect a theme to. I also looked to the art of Chris Gilmour as well as Claes Oldenburg and Coosje van Bruggen in order to find inspiration. I eventually chose to enlarge a ring that I own that is a large part of my identity. The ring was a large part of my aunt's identity, that has now been passed down to me and became an integral part of my identity. Through this piece I wanted to explore the way in which identity can be passed down between generations.
I sketched out the different angles of the ring in order to begin to get an idea of the form and shape of the ring. I wanted to know what it looked like from each angle, and where each part of the ring was located. I also needed to begin to consider how I could replicate this object using cardboard and how I could complete this process. This was the most difficult part of planning for me because I've never worked with cardboard as a medium before, so I had no clue how to use it to create a sculpture. 
After figuring out my plan of how I wanted the object to look, I needed to make a plan for how to actually construct this object. I had the opportunity to meet with somebody who had previously worked with cardboard construction and was able to give me very helpful advice on how to proceed with my axiomatic object. I decided that I was going to make each rectangle on the ring a separate box in order to make them pop out. Once I had all of the squares I planned to lay them all out on a large scored piece of cardboard in order to achieve the curved effect of the ring. Then I planned to cut out openings between each of the squares in order to more closely replicate what the ring really looks like. I also planned how I would achieve the clean look of the cardboard sculptors made by Chris Gilmour. I decided that I would place a thin layer of cardboard over the boxes and hold it in place using paper tape.The paper tape would blend into the brown cardboard, and allow me to create clean creases and edges on my sculpture.
|
PROCESS

The actual creation of the boxes were the most time consuming part of this process. I had to make sure that each box was a consistent size and height so that when I eventually glued them together, they would look clean and uniform just like they looked on the ring. Each box had a curved top and bottom and rectangular sides. I also decided to not add a back to the boxes because I felt that it would be a waste of cardboard since I would be adding a back onto all of the boxes later in the process.
Once everything was cut to the proper sizing, I had to tape the cardboard onto the box. I used paper tape for this because since it's brown it blends into the cardboard and it allowed me to create clean edges on my work. I put a large stripe of tape on each of the edges of the cardboard, taping it to the back of the boxes. Once every edge had been taped, I folded over the extra parts of cardboard and taped those down as well. I was really happy with the outcome of this method, and I continued this method with all 28 boxes that I created. Once I had the cardboard wrapped around the ring on both sides, I trimmed the excess cardboard so that it fit the shape of the ring. I then added tape around the edges of the ring in order to give it a more clean look then it had before. I also taped the parts of the ring where it was being held together in order to give it extra stability. After the physical ring itself was done, I used hot glue to place the boxes onto the front of the ring, in the same order as I had laid them out earlier. I also cut holes in between the boxes to make sure it was a complete replica of the ring I own. |
I started off my process by measuring out a large section of cardboard and scoring it. I made the square 18.5 cm by 13.7 cm and scored the cardboard using an X-ACTO blade, lining up marks that I made every 0.635 cm and cutting stripes. I had to make sure that I didn't cut too deep into the cardboard so that I didn't cut straight through and accidentally cut the cardboard into pieces. After I cut the strips I also cut the cardboard into 4 sections so that I could make each section into a box on the ring. I curved the scored cardboard pieces and traced where they outlined so that I could cut out a top and bottom piece for the box. I used hot glue to keep the box held together. I then cut small stripes of rectangular cardboard to the size of the sides of the box. I used hot glue to hold these parts together as well. I repeated this process and created 28 boxes for my sculpture, the same amount of boxes as my actual ring. I laid out the boxes in alternating rows of 5 and 6, making sure that they were staggered and that the boxes touched the tops and bottoms of the boxes on top of and beneath them.
Once all of the boxes had been created, I moved on to cleaning them up. I cut large pieces of cardboard and placed them in a large container of water and let them soak. Once the cardboard had become wet, I was better able to separate the pieces of corrugated board from the thinner pieces of cardboard. I needed only the thin pieces to cover my boxes. Once they were separated I placed the wet cardboard over the boxes and folded over the corners in order to make it dry in a certain shape. Once the cardboard had dried I trimmed the edges of the cardboard to make sure there was enough of it to fold over the edges, but not too much overhang. I struggled with this at first, because I always kept cutting a little too much cardboard off of the sides, making it too short. After all of the boxes of my ring had been made, I needed to make the actual body of the ring. I started out by laying out all of the boxes I had created in the order and spacing in which I wanted them to look like. After they were all laid out, I measured the length and width of the arrangement. I marked these measurements onto a larger piece of cardboard and cut out a large rectangular piece, then I scored this piece to use as the front of my ring where all of the boxes would be placed. Then I used this piece to measure out the sides of the ring. I cut one slightly curved piece and then used that piece to trace out an identical piece for the other side of the ring. Once all of the pieces had been made, I used hot glue and paper tape in order to hold the pieces together. I also used a hula-hoop on the inside of the ring temporarily in order to help it keep its shape since I had noticed that the cardboard was a little flimsy once I put it all together.
Once the base was constructed, I used the same method I used earlier to separate the corrugated board and cardboard, just on a much larger scale this time. I ran into a problem with the cardboard I was using though because it wasn't coming out as clean as it was before. After a few trials though I was able to get a few clean pieces and had to let them dry. Once they had dried I used a large brush to brush glue onto the base. I started with the front part of the ring and used a generous amount of glue. I was hoping that this would not only make the cardboard more stiff, but would also be able to keep the thin cardboard in place.
|


EXPERIMENTATION

The other type of experimentation I did was when I was trying to figure out how to make the cardboard hold the curve and shape that I needed it to hold. When I had originally made the ring, it was flimsy and wasn't holding the shape that I needed it to hold. I considered that maybe if I used a lot of glue on the outside and in between the creases, maybe it would help to not only stiffen the cardboard, but I would also be able to use the glue to hold the thin cardboard onto the shape. I used a smaller piece of cardboard and tested out this method, and placed it around a circular object to see if that would help it hold its shape as well. I also put tape on the outside for extra precaution. I let that dry for a few hours and then looked to see how my experiment had turned out and it actually worked very well. I was then able to follow this same method but on a much larger scale with my ring. |
A lot of the experimentation I did had to do with the different parts and pieces of the cardboard and figuring out how I was going to only use cardboard to complete this project. I started out the beginning of this project by looking at the different layers of cardboard, and considering how I was going to separate the pieces of regular cardboard from the pieces of corrugated cardboard. I initially ripped apart a few smaller pieces of cardboard in order to determine what would be the simplest method for separation. I quickly figured out that ripping these pieces of cardboard while dry was not going to work out. So I then tested out if it would be easier to take it apart while it was wet. While the cardboard was wet it was a lot easier to take the pieces apart, and I determined that this would be the method I used for the rest of my project.

|


CRITIQUE


There are a lot of similarities between my piece and the work of Claes Oldenburg and Chris Gilmour. For starters both my piece Generational Treasure and Chris Gilmour's piece Camera are pieces made from various forms of cardboard. We both had the challenge of using almost completely cardboard to construct an everyday object. Another similarity between my pieces and my inspirations is that we have all chosen to create a sculpture of an ordinary object. We haven't created something that's abstract, we've all created something that you would be able to see in the day to day world. A similarity between my piece and Claes Olderburg and Cooseje van Bruggen's piece Spoonbridge and Cherry is that we have both taken an everyday object and distorted how it's viewed. In real life, a spoon doesn't typically bend like that, just like how in real life you wouldn't find a ring that's the size of the sculpture I created.
There's also a lot of differences between my piece and my inspirations. One difference is that my sculpture is made completely out of cardboard, tape, and glue, whereas my inspirations used a variety of materials to create their sculptures. While Chris Gilmour did make his sculptures out of cardboard, he also used other materials in addition to the cardboard. Another difference between Generational Treasure and Camera is that I significantly scaled up the size of the object I was replicating. My cardboard ring is at least ten times the size of my original ring, whereas Gilmour's sculpture is made to scale.
There's also a lot of differences between my piece and my inspirations. One difference is that my sculpture is made completely out of cardboard, tape, and glue, whereas my inspirations used a variety of materials to create their sculptures. While Chris Gilmour did make his sculptures out of cardboard, he also used other materials in addition to the cardboard. Another difference between Generational Treasure and Camera is that I significantly scaled up the size of the object I was replicating. My cardboard ring is at least ten times the size of my original ring, whereas Gilmour's sculpture is made to scale.
REFLECTION
Overall this project was one of the most challenging and time consuming pieces I have ever made. I really struggled to make this one, but was really happy with how it turned out in the end. This project taught me a lot about time management, and how to effectively lay out what I should be completing each day. I was actually very happy with my own time management skills throughout this project because I didn't procrastinate it and actually stuck to the schedule that I had created for myself. I had also never really experimented with the sculpting medium before, and this project gave me the opportunity to explore a new challenging medium. In addition to never experimenting with sculpting before, I've also never worked with cardboard before. I had to explore all of the parts of a brand new material that I had never even considered working with before. My favorite part of this project was being able to see the piece all together at the end. It was very rewarding to see that all of my hard work had paid off. I hope that others are able to look at my work and see all of the time and effort that I put in to creating a cardboard sculpture of my aunt's ring.
ACT QUESTIONS
1. Clearly explain how you are able to identify the cause effect relationship between your inspiration and its effect on your artwork?
My piece was a large sculpture of an everyday object similar to Chris Gilmour's work. My sculpture also had a distorted form similar to Claes Oldenburg and Coosje van Bruggen's sculptures.
2. What is the overall approach the author has regarding the topic of your inspiration?
The ability that sculptures have to produce clean work in any chosen medium.
3. What kind of generalizations and conclusions have you discovered about people, ideas, culture, etc. while you researched your inspiration?
I found that the ways and mediums in which people choose to create their artworks have a large impact on the way that the artwork itself is viewed.
4. What is the central idea or theme around your inspirational research?.
The way in which a medium can be manipulated in order to produce a certain style.
5. What kind of inferences did you make while reading your research?
I inferred that the goal of Claes Olderburg, Coosje can Bruggen, and Chris Gilmour was to change the way that we view everyday objects through their artwork.
CITATIONS (MLA)
“Plantoir.” Greater Des Moines Public Art Foundation, 6 Nov. 2018, https://dsmpublicartfoundation.org/lesson-plan/plantoir/.
Claes Oldenburg & Coosje Van Bruggen: Exhibitions & Projects: Spoonbridge and Cherry, http://oldenburgvanbruggen.com/largescaleprojects/spoonbridge.htm.
“Chris Gilmour Artworks.” Chris Gilmour, http://www.chrisgilmour.com/.
Claes Oldenburg & Coosje Van Bruggen: Exhibitions & Projects: Spoonbridge and Cherry, http://oldenburgvanbruggen.com/largescaleprojects/spoonbridge.htm.
“Chris Gilmour Artworks.” Chris Gilmour, http://www.chrisgilmour.com/.
